How To Sculpt Faces
In order to sculpt faces in clay a sculptor needs to be prepared to do a bit of ground work and preparation. In my view, it is the single most difficult thing of all in clay sculpture. For a start, a human face is one of the most complex geometrical shapes you will ever see.
When you are pushing around bits of clay, tiny fractions of a millimeter can make a difference between the face of a beautiful bonny bouncing baby and Winston Churchill.
On this page I give you a list of things to prepare, and then a practical method of how to sculpt a face for you to try.
But first some fundamentals.
The Fundamentals of Faces
If you are going for portraiture likeness of a real person, in technical terms, there are only fractional differences in the geometry of the faces of two people who look completely different.
For example, Kate Middleton and her sister, Pippa.
Kate and Pippa look very alike - with good reason, the geometry of their faces is very similar. But our eyes possesses the highly tuned skill of instant facial recognition.
We know instantly they look like completely different individuals, but how do we tell our piece of clay what the differences are?
Thereby hangs one of the biggest dilemmas of sculpture. Finely tuned visual recognition evolved over 3 million years, versus a sticky lump of mud from the ground.
We need to even the odds in our favour in order to sculpt faces.
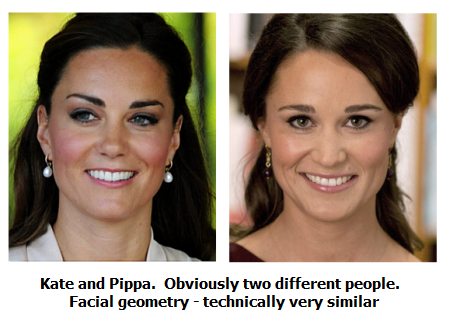
If you look closely, you will see the two big points of difference to the sculptor's eye are the nose and the eyebrows.
So that is what we tell our piece of clay.
However, before we get to the fine tuning of the eyebrows and nose stage that stage, we obviously need to...
- Produce something which looks vaguely human
- And vaguely female
- Something with approximate geometry of the Middleton's faces
- Something that appears more like Kate than Pippa
What Does it Take for YOU to Sculpt that face?
There are many time lapse videos on you tube of very able sculptors doing their thing - very useful in their own way.
This tutorial on how to sculpt faces is not one of those - for a reason.
I have a problem with those type of tutorials because they miss out the main player in this whole game - the principles of what a sculptor's mind has to do in order to do something as difficult as sculpting a face.
Those guys make it look easy. They are time-lapsing away the hours/days of the mental process - the fine adjustment and sweat and toil it takes to tell the clay what to do.
I am interested in what it takes for YOU (not someone else) to sculpt a real looking face that not only looks vaguely human, but also looks vaguely like the person it is supposed to look like.
If we do this prep right, and then use my simplified practical method of how to sculpt faces, perhaps it will be doable.
|
|
The Prep List
The list applies whether you are sculpting to a large or small scale.
My own speciality is to sculpt faces which are small but very realistic portraits of ladies faces (see photo below) - the faces are less than an inch high.
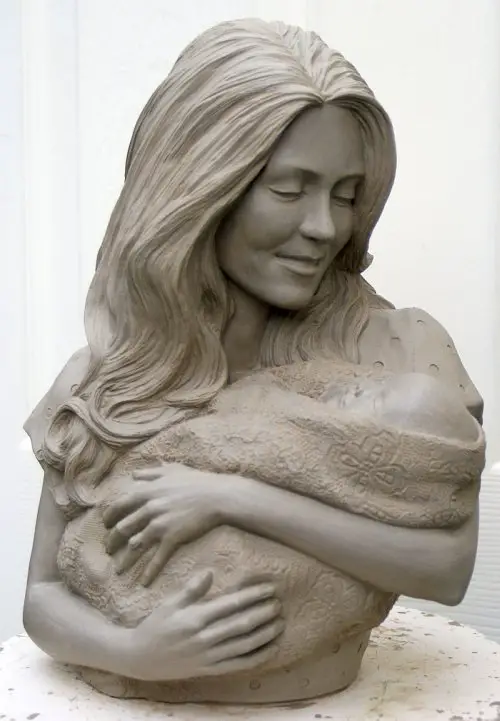
However, I do the occasional portrait bust like the one shown at the top of the page which is about 15" high.

Here's the 'how to sculpt faces' prep list:-
- Don't go by eye alone until you are very experienced (in fact until you classify yourself as a genius).
- You need to really get to know the face of your subject and the proportions of their features by accurately measuring and scaling.
- First, I photograph the subject (or find photographs of them if they are famous people) front and side (making sure the faces are not angled up or down, but pointing straight at the camera)
- I then used a photocopier to scale the photos down to the required scale.
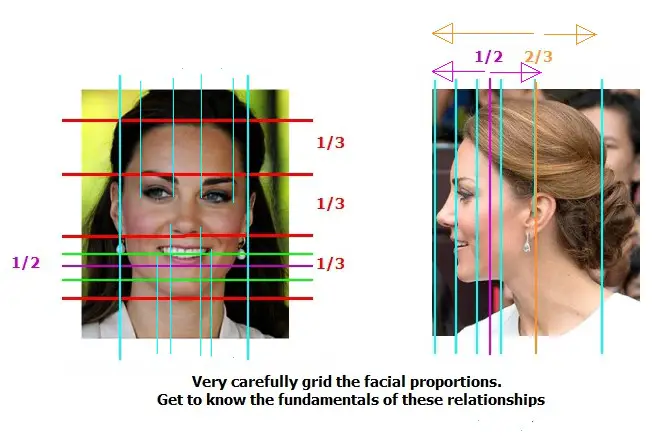
- I then draw grid lines on the photocopies both side and front views to study the distances from various points (and planes). For example, many beginners place their subjects eyes too far back in profile, so therefore you end up with what is known as a 'dog' face.
click on photo to enlarge it
- Study the planes carefully. For example, the mouth
follows the shape of the teeth and curves like a half circle (even when
not smiling).
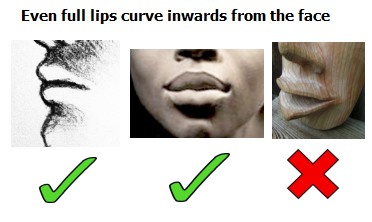
- Remember, the lips do not project out from a face, they curve inwards to the meet the teeth inside from the facial muscles (above and below). Many beginners sculpt the mouth onto the flat plane of the face with outward lips. This gives the characteristic thin mouthed pout of a primitive carving.
- The eyes are half between the top of the head and the chin - something most beginners refuse to believe (as they mistake the top of the head for the top of the forehead). That's why I say DO NOT do things by eye unless you are very experienced and know your measurements by heart.
- Study and note the relative positions of the features on your grid lines and follow what the diagram shows you. When you are a 'master' you can dispense with measurements. I still check measurements, although I am referred to as a 'master-sculptor'.
- Then, and only then, you can use some artistry to capture the soul of the person.
- 'Fail to prepare and prepare to fail. So, once you have studied your subject in
detail, you can go on to try a very practical method to sculpt faces shown below
How to Sculpt Faces - A Practical Method To Try
Immersing yourself in the accurate geometry of faces can be quite fun rather than hard work, but I try not to let it be a substitute for actually starting the piece.
Here's a method that can help a face sculpture get off to a good start.
A Method To Sculpt Faces
- Get a profile photo like the one above of Kate
- Scale it and print it out to the right size
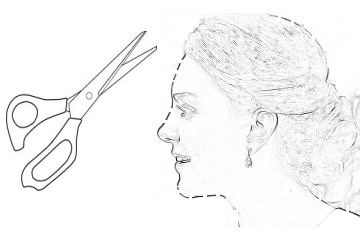
- Cut out around the shape of the face and head
- Roll out a slab of clay to the height of about the width of the subject's nose (about the distance between the eyes)
- Allow the slab of clay to dry enough so it doesn't flop about or get finger marked when lifted - but you can still easily cut it with a potter's knife
- Now place the profile photo (silhouette) on the clay and mark around it
- Cut out the shape of the head profile in the slab of clay
- You now have a slab of clay in the shape of an accurate silhouette of your subject
- Thicken up the neck enough for the piece to stand on a bat
- You will see that 2 of the 3 dimensions is perfect (the profile and the height)
- Now you just need to add one further dimension (width) instead of all three
- Follow the grid lines in your scaled photos. Build up the rest of the head first rather than the face as this will build a structural support for the sculpture
- Once you have the basic but accurate geometry of the face of your subject in place, you can begin to work on the small details which differentiate one face from another
- Once you reach a certain point in the sculpt, you can start to think about the person themselves, what might make them tick, how they might think. Thinking about them, rather than you, will begin to translate into the piece and help give it real character and emotions
Summary
In this how to sculpt faces article, I have tried to give people with the 'clay bug' a systematic, practical method where they can realistically attempt to model a portrait in clay, even if they are beginners.
I hope you are able to give it a go. The main point to take on board is, your eye is so highly evolved as an intuitive observation device that the clumsiness of clay is no match whatsoever.
This mismatch being the essence of the difficulty, an artist needs every available technical aid in order to redress this imbalance.
Once you have accepted this anomaly and decided to go with it, you will find things roll into place much more easily.
What I am trying to say is ....
Because clay is essentially non-co-operative mud, we need to tease it into place bit-by-bit and measure, adjust, measure adjust and so on.
Further reading:
More on the dimensions of human faces
return from How to sculpt faces to Figurines Sculpture homepage or alternatively back to Clay Sculpting
